Master Frontend System Design: The RADIO Framework for Acing Technical Interviews
Marcus Chen
Performance Engineer
Frontend system design interviews can be overwhelming with their broad scope of topics - from rendering performance to API protocols and data modeling. However, with a structured approach, you can tackle any frontend system design challenge with confidence. This comprehensive guide introduces the RADIO framework, a powerful methodology that simplifies the interview process and ensures you cover all critical aspects of frontend system design.
The RADIO Framework: Your Roadmap to Success
RADIO is an acronym that represents the five essential steps to navigate any frontend system design interview successfully:
- R - Requirements
- A - Architecture (high-level)
- D - Data flow model
- I - Interface (API design)
- O - Optimizations and performance
This framework provides a systematic approach to breaking down complex design challenges into manageable components. Let's explore each step in detail.
Requirements: Setting the Foundation (10% of Your Time)
The requirements phase is where you establish a clear understanding of what you're building. This should take approximately 10% of your interview time and includes both functional and non-functional requirements.
Functional Requirements
Functional requirements define the specific features and capabilities your solution must provide. For example, if designing a Facebook news feed, you might focus on:
- A feed displaying a list of posts with comments
- Support for specific post types (text, images)
- Infinite scroll functionality for continuous content loading
- User interaction features (likes, comments, shares)
Non-Functional Requirements
Non-functional requirements address the quality attributes and constraints of your solution:
- Target platforms (mobile, web, or both)
- Offline capabilities (if needed)
- Accessibility compliance requirements
- Internationalization support
- Performance expectations and latency requirements
- Expected user volume and scaling considerations
Discussing non-functional requirements demonstrates your holistic understanding of software development and helps narrow the scope of your design to focus on what matters most.
Architecture: Building the Blueprint (10-15% of Your Time)
The architecture phase involves creating a high-level design of your solution's components and their interactions. Start with a simple UI sketch to visualize the end product, then break down the system into its core components.
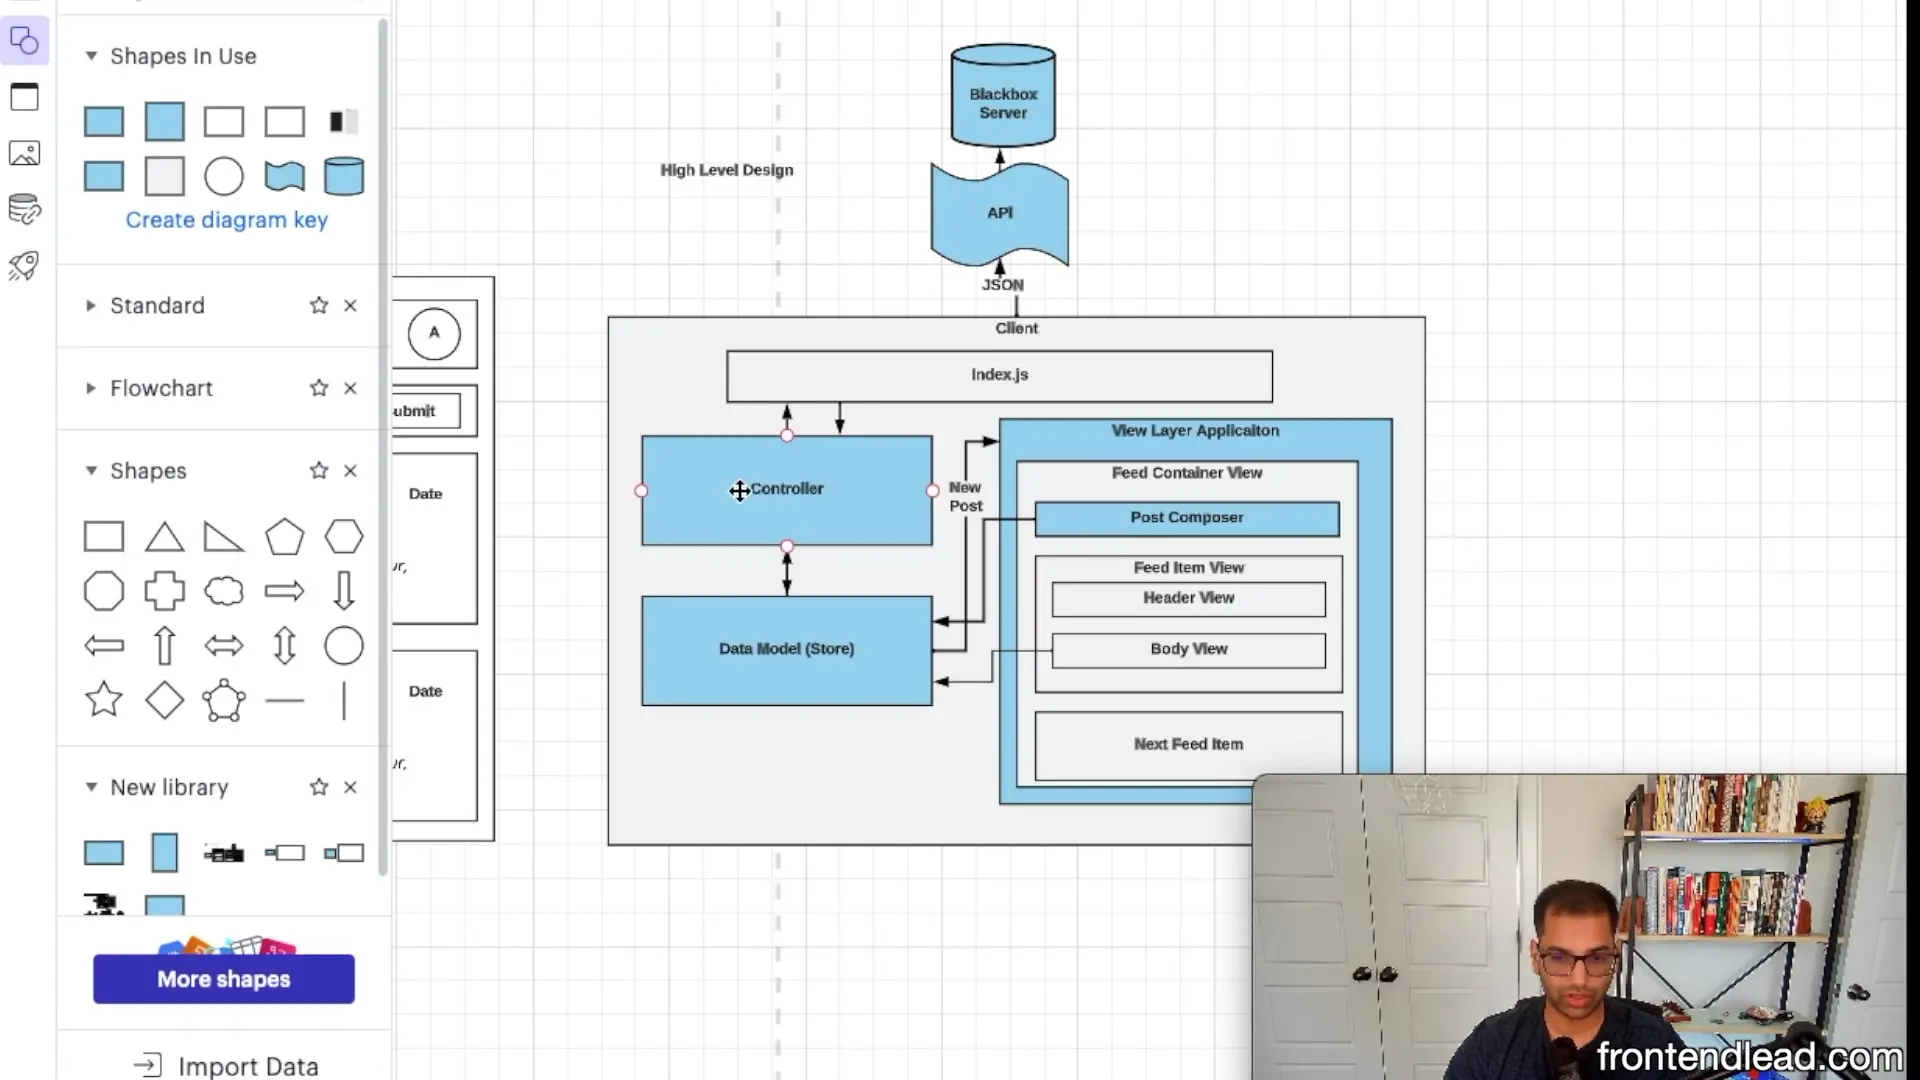
For our Facebook news feed example, the high-level architecture might include:
- Header component with navigation and search functionality
- Post composer component for creating new content
- Feed container to manage post loading and display
- Individual feed item components with support for different content types
- Comment section components nested within feed items
- Infinite scroll mechanism for pagination
When discussing architecture, focus on component organization, state management approaches, and the overall pattern (MVC, MVVM, etc.) you're employing. This is also the time to address any technical constraints or limitations that might influence your design decisions.
// Example component structure for a news feed
const NewsFeed = () => {
  const [posts, setPosts] = useState([]);
  const [isLoading, setIsLoading] = useState(false);

  const loadMorePosts = useCallback(() => {
    setIsLoading(true);
    // API call to fetch more posts
    fetchPosts().then(newPosts => {
      setPosts(prevPosts => [...prevPosts, ...newPosts]);
      setIsLoading(false);
    });
  }, []);

  return (
    <div className="news-feed">
      <Header />
      <PostComposer />
      <FeedContainer posts={posts} />
      {isLoading && <LoadingIndicator />}
      <InfiniteScroll onReachBottom={loadMorePosts} />
    </div>
  );
};Data Flow Model: Structuring Your Information (15% of Your Time)
The data flow model defines how information moves through your application and how it's structured. This includes defining data types, state management strategies, and data transformation processes.
For a news feed application, you'll want to design:
- Data models for posts, comments, users, and other entities
- State management approach (Redux, Context API, MobX, etc.)
- Data normalization strategies to avoid duplication
- Local storage considerations for offline capabilities
- Data transformation and formatting logic
// Example data models for a news feed
interface User {
  id: string;
  name: string;
  avatarUrl: string;
}

interface Post {
  id: string;
  author: User;
  content: {
    text?: string;
    mediaUrl?: string;
    mediaType?: 'image' | 'video';
  };
  createdAt: number;
  likes: number;
  comments: Comment[];
}

interface Comment {
  id: string;
  author: User;
  text: string;
  createdAt: number;
  likes: number;
}Discuss how data flows from the server to the client, how it's stored locally, and how updates are propagated throughout the application. This demonstrates your understanding of frontend data management principles.
Interface (API Design): Connecting Your Frontend (15% of Your Time)
The interface phase focuses on how your frontend communicates with backend services. This includes selecting appropriate API protocols and designing the API layer.
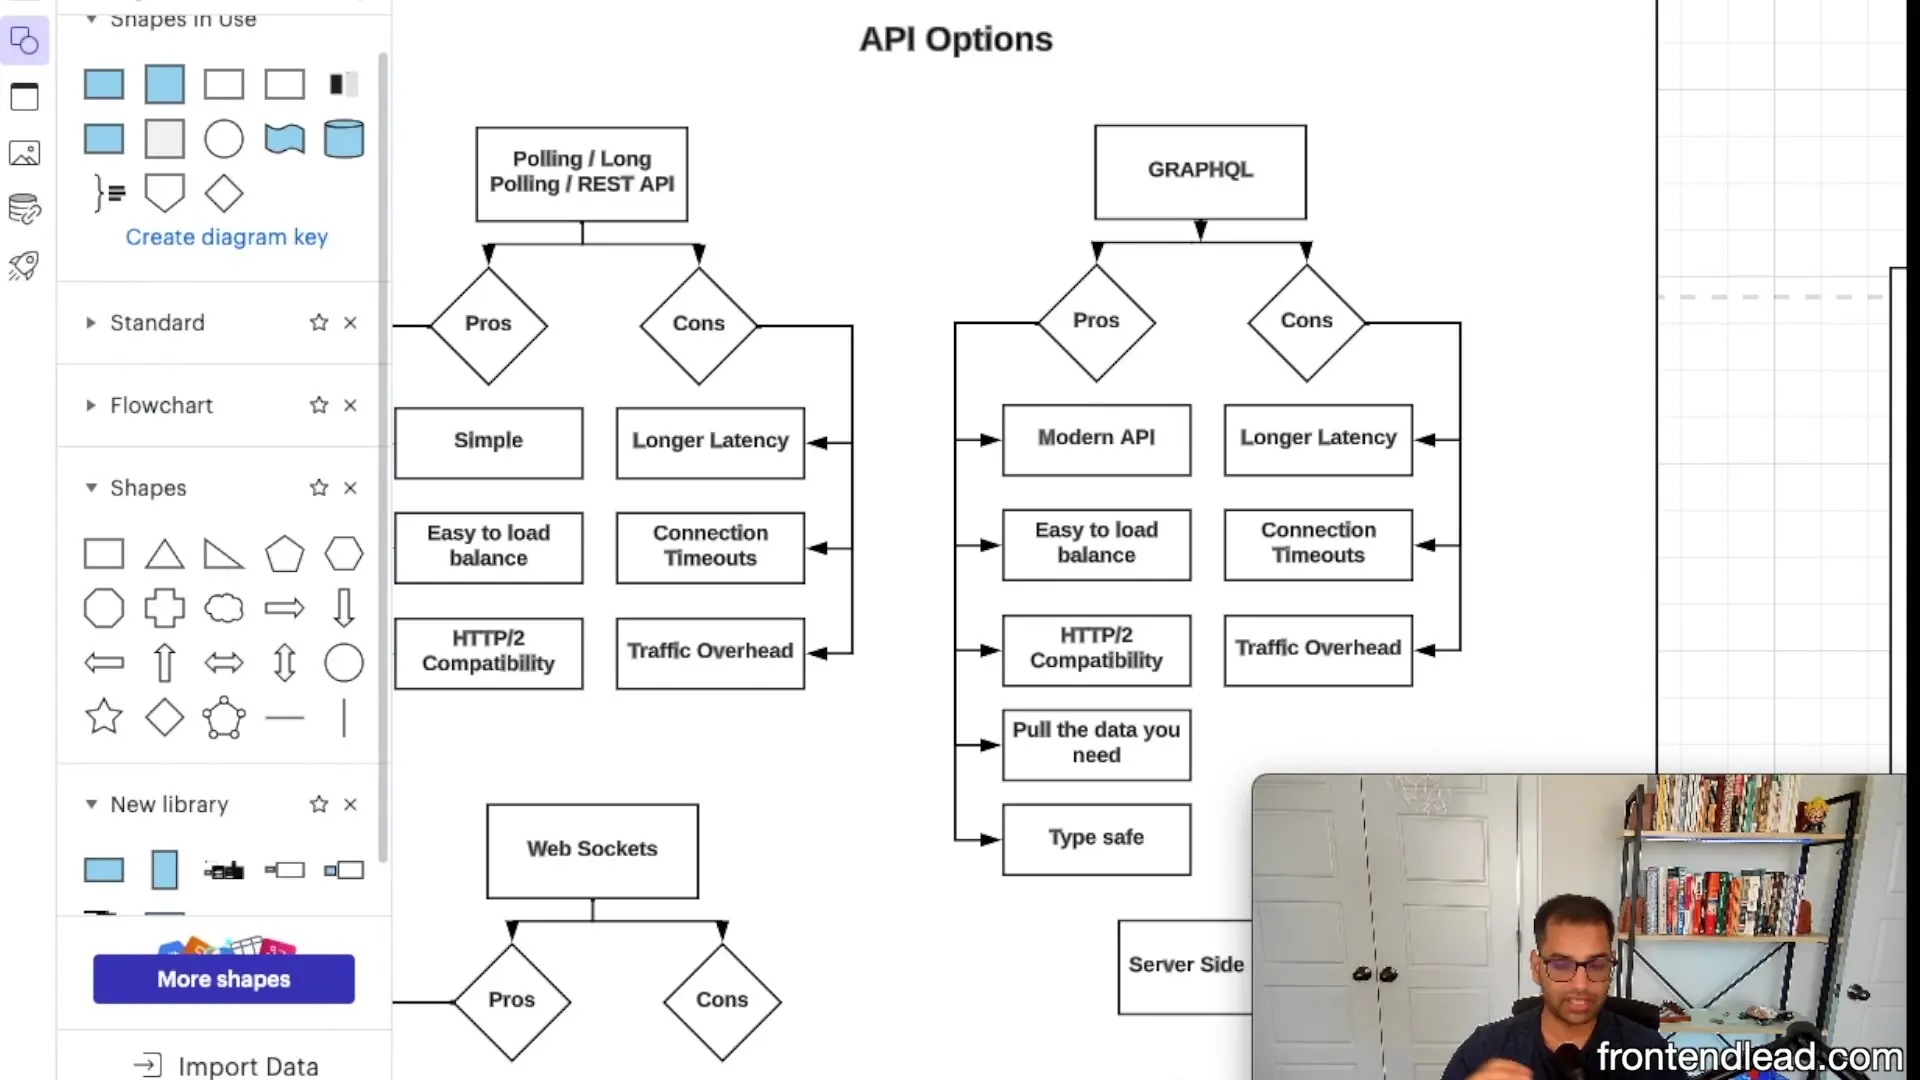
Choosing an API Protocol
Discuss the pros and cons of different API protocols and justify your choice for the specific application:
- REST: Simple, widely adopted, but can lead to over-fetching
- GraphQL: Flexible data fetching, reduced over-fetching, but increased complexity
- WebSockets: Real-time bidirectional communication, ideal for live updates
- HTTP/1.1 vs. HTTP/2: Performance considerations and browser support
API Layer Design
Once you've selected a protocol, design the API layer by defining:
- Endpoint structure and naming conventions
- Authentication and authorization mechanisms
- Request/response formats and data structures
- Error handling strategies
- Rate limiting and caching considerations
// Example API client for a news feed using REST
const api = {
  baseUrl: 'https://api.example.com/v1',

  async getFeed(page = 1, limit = 20) {
    const response = await fetch(`${this.baseUrl}/feed?page=${page}&limit=${limit}`, {
      headers: {
        'Authorization': `Bearer ${getAuthToken()}`
      }
    });

    if (!response.ok) {
      throw new Error(`Failed to fetch feed: ${response.statusText}`);
    }

    return response.json();
  },

  async createPost(content) {
    const response = await fetch(`${this.baseUrl}/posts`, {
      method: 'POST',
      headers: {
        'Content-Type': 'application/json',
        'Authorization': `Bearer ${getAuthToken()}`
      },
      body: JSON.stringify(content)
    });

    if (!response.ok) {
      throw new Error(`Failed to create post: ${response.statusText}`);
    }

    return response.json();
  }
};Optimizations and Performance: Polishing Your Solution (40-50% of Your Time)
The optimization phase is where you'll spend the majority of your interview time. This is your opportunity to demonstrate deep technical knowledge and attention to detail by addressing various performance concerns.

Rendering Performance
Discuss strategies to optimize rendering performance:
- Virtualization for long lists (using libraries like react-window or react-virtualized)
- Code splitting and lazy loading for reduced initial bundle size
- Tree shaking to eliminate unused code
- Memoization to prevent unnecessary re-renders
- Critical CSS and above-the-fold optimization
- Server-side rendering (SSR) or static site generation (SSG) for improved initial load time
// Example of virtualization for a news feed
import { FixedSizeList } from 'react-window';

const VirtualizedFeed = ({ posts }) => {
  const renderPost = ({ index, style }) => (
    <div style={style}>
      <PostItem post={posts[index]} />
    </div>
  );

  return (
    <FixedSizeList
      height={800}
      width="100%"
      itemCount={posts.length}
      itemSize={300} // Average height of a post
    >
      {renderPost}
    </FixedSizeList>
  );
};Network Performance
Address strategies to optimize network performance:
- Caching strategies (HTTP cache, service workers)
- Request batching and aggregation
- Data prefetching and preloading
- Compression techniques (Gzip, Brotli)
- CDN utilization for static assets
- Progressive loading strategies
Additional Optimization Areas
Don't forget to address these important aspects:
- Security considerations (XSS prevention, CSRF protection, content security policies)
- Accessibility optimizations (ARIA attributes, keyboard navigation, screen reader support)
- Error handling and fallback strategies
- Performance monitoring and analytics
- Progressive enhancement for varying device capabilities
Putting It All Together: A Complete System Design
A successful frontend system design interview demonstrates your ability to think holistically about complex problems. By following the RADIO framework, you ensure comprehensive coverage of all critical aspects while maintaining a structured approach that interviewers can easily follow.
Let's summarize the time allocation for each step of the RADIO framework:
- Requirements: 10% of your time
- Architecture: 10-15% of your time
- Data flow model: 15% of your time
- Interface (API design): 15% of your time
- Optimizations and performance: 40-50% of your time
This distribution ensures you spend the majority of your time on the areas that demonstrate the depth of your technical knowledge while still covering all necessary foundational elements.
Conclusion: Practice Makes Perfect
Frontend system design interviews can be challenging due to their broad scope, but with the RADIO framework, you now have a structured approach to tackle any design challenge. Remember that practice is essential - try applying this framework to different scenarios like designing a photo-sharing app, an e-commerce product page, or a collaborative document editor.
By consistently applying this methodology and expanding your knowledge of frontend optimizations and best practices, you'll build the confidence needed to ace any frontend system design interview, regardless of the specific question posed.
Let's Watch!
Master Frontend System Design: The RADIO Framework for Technical Interviews
Ready to enhance your neural network?
Access our quantum knowledge cores and upgrade your programming abilities.
Initialize Training Sequence