How to Build Your First Pose Detection Web Application Using TensorFlow.js and MoveNet
Eleanor Park
Developer Advocate

Creating a web application that can analyze human movements might seem like an advanced project requiring deep expertise in both frontend development and machine learning. However, with modern tools like TensorFlow.js and pre-trained models, even developers with limited frontend experience can build sophisticated applications that track and analyze human poses in videos.
Understanding Pose Detection with TensorFlow.js
Before diving into development, it's essential to understand what pose detection is and how TensorFlow.js makes it accessible. Pose detection using TensorFlow.js is fundamentally different from face detection, though both involve computer vision techniques. While facial recognition identifies who someone is, face detection using TensorFlow.js simply locates faces in images or video. Pose detection takes this concept further by identifying key points of the human body in motion.
TensorFlow.js has revolutionized browser-based machine learning by bringing powerful ML capabilities directly to web applications without requiring server-side processing. For pose detection specifically, the next generation pose detection with MoveNet and TensorFlow.js offers impressive performance even on devices with limited computational resources.
Project Overview: Building an Exercise Repetition Counter
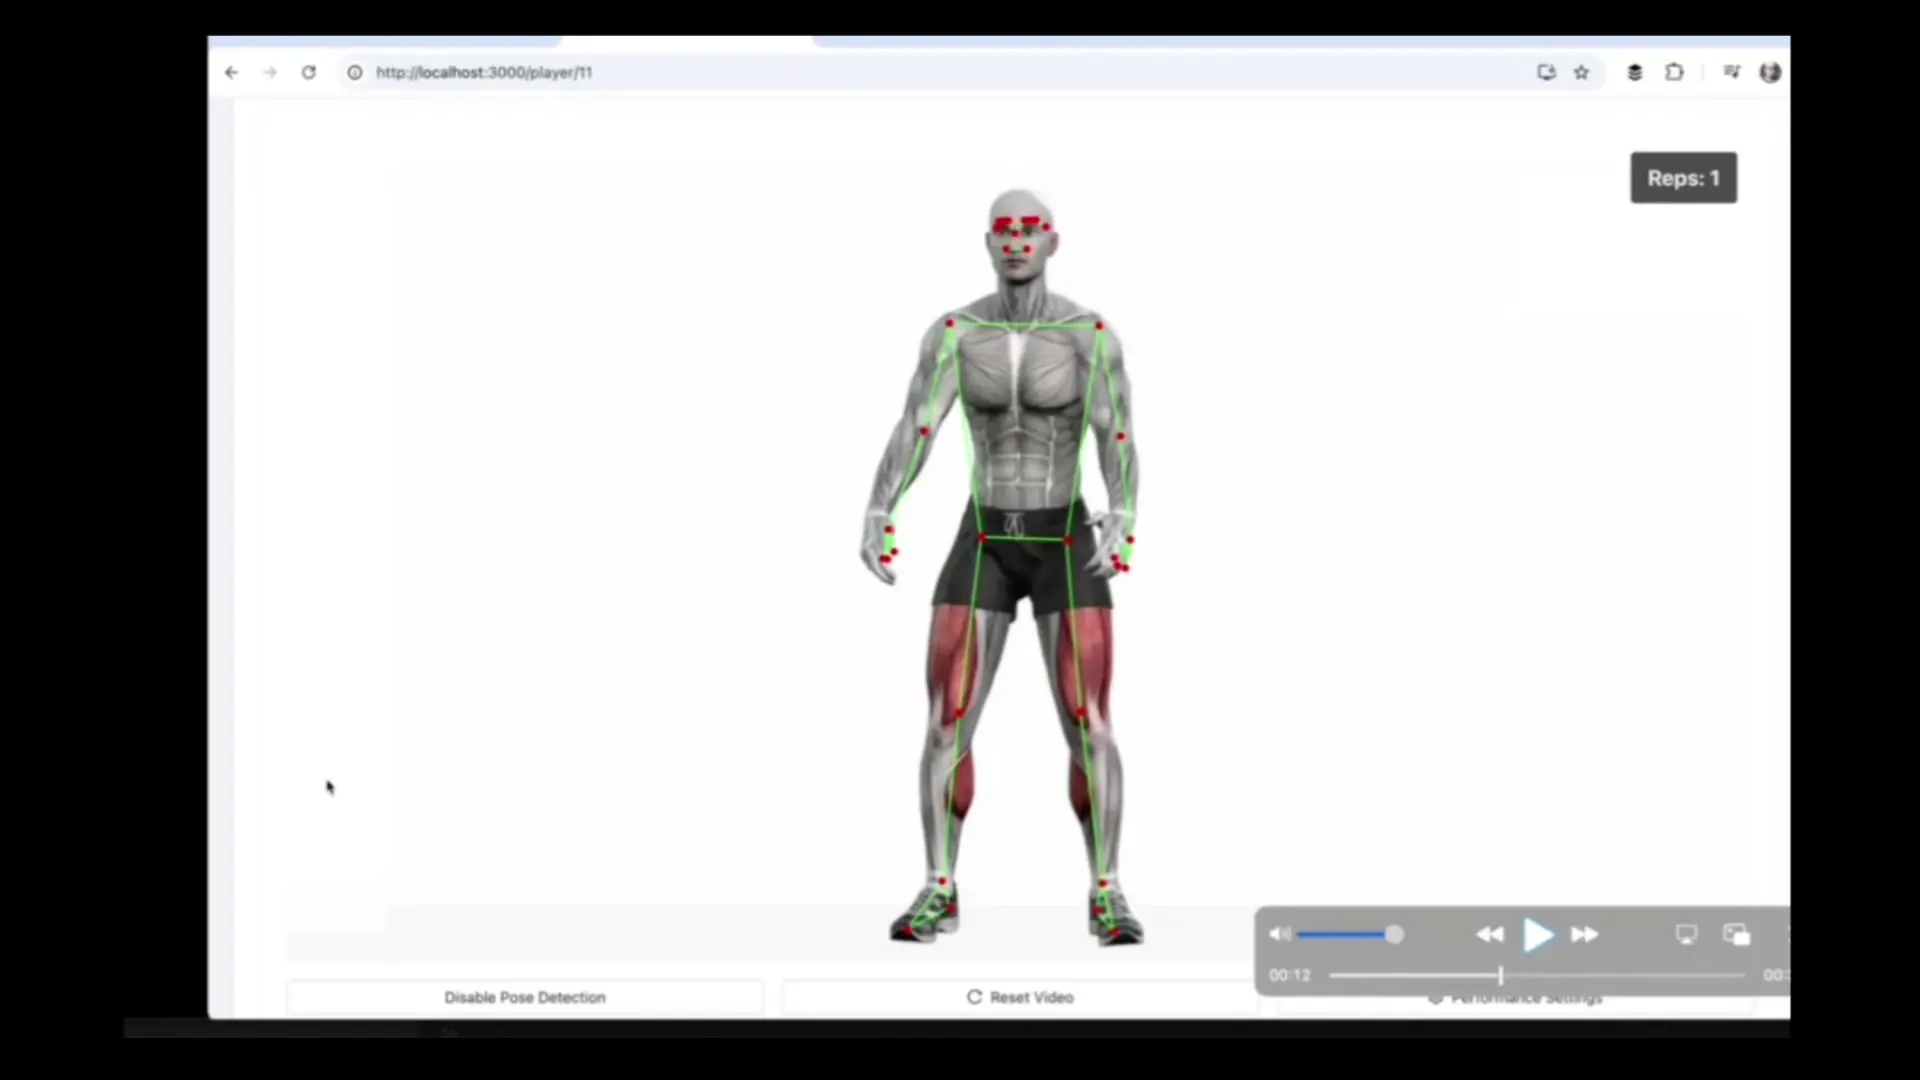
Our application will allow users to upload exercise videos, analyze body movements using pose detection, and automatically count repetitions of exercises like squats. The core functionality includes:
- Video upload and playback functionality
- Real-time pose detection using TensorFlow.js
- Visual overlay of detected key points on the video
- State tracking to count exercise repetitions
- Display of confidence scores and movement analytics
Setting Up Your Development Environment
To begin building our pose detection application, we'll need to set up a TypeScript project. TypeScript provides type safety that helps prevent errors, especially valuable when working with complex libraries like TensorFlow.js.
Start by creating a new project directory and initialize it with the following structure:
mkdir my-gym-app
cd my-gym-app
npm init -y
npm install typescript @types/node --save-dev
npm install @tensorflow/tfjs @tensorflow-models/pose-detectionCreate a basic TypeScript configuration file (tsconfig.json):
{
  "compilerOptions": {
    "target": "es2015",
    "module": "esnext",
    "moduleResolution": "node",
    "strict": true,
    "esModuleInterop": true,
    "skipLibCheck": true,
    "forceConsistentCasingInFileNames": true,
    "outDir": "./dist",
    "lib": ["dom", "es2015"]
  },
  "include": ["src/**/*"]
}Creating the Web Interface
Our application needs a simple but functional UI that allows users to upload videos and see the pose detection results. Let's create a basic HTML structure:
<!DOCTYPE html>
<html lang="en">
<head>
  <meta charset="UTF-8">
  <meta name="viewport" content="width=device-width, initial-scale=1.0">
  <title>MyGym - Exercise Analysis</title>
  <link rel="stylesheet" href="styles.css">
</head>
<body>
  <div class="container">
    <h1>MyGym Exercise Analyzer</h1>

    <div class="upload-section">
      <input type="file" id="video-upload" accept="video/*">
      <button id="analyze-btn">Analyze Exercise</button>
    </div>

    <div class="video-container">
      <video id="video-player" controls></video>
      <canvas id="pose-canvas"></canvas>
    </div>

    <div class="stats-container">
      <div class="rep-counter">Repetitions: <span id="rep-count">0</span></div>
      <div class="confidence">Confidence: <span id="confidence-score">0</span>%</div>
    </div>
  </div>

  <script src="dist/app.js" type="module"></script>
</body>
</html>Add some basic styling with CSS:
body {
  font-family: Arial, sans-serif;
  margin: 0;
  padding: 20px;
  background-color: #f5f5f5;
}

.container {
  max-width: 800px;
  margin: 0 auto;
  background-color: white;
  padding: 20px;
  border-radius: 8px;
  box-shadow: 0 2px 10px rgba(0, 0, 0, 0.1);
}

.video-container {
  position: relative;
  margin: 20px 0;
}

video {
  width: 100%;
  display: block;
}

canvas {
  position: absolute;
  top: 0;
  left: 0;
  width: 100%;
  height: 100%;
}

.stats-container {
  display: flex;
  justify-content: space-between;
  background-color: #f0f0f0;
  padding: 10px;
  border-radius: 4px;
  margin-top: 20px;
  font-weight: bold;
}Implementing Pose Detection with TensorFlow.js
Now let's implement the core functionality of our application. We'll use the MoveNet model for next generation pose detection with MoveNet and TensorFlow.js, which offers an excellent balance of speed and accuracy.
Create a file named src/app.ts with the following code:
import * as tf from '@tensorflow/tfjs';
import * as poseDetection from '@tensorflow-models/pose-detection';

// DOM Elements
const videoElement = document.getElementById('video-player') as HTMLVideoElement;
const videoUpload = document.getElementById('video-upload') as HTMLInputElement;
const analyzeButton = document.getElementById('analyze-btn') as HTMLButtonElement;
const canvas = document.getElementById('pose-canvas') as HTMLCanvasElement;
const repCountElement = document.getElementById('rep-count') as HTMLSpanElement;
const confidenceElement = document.getElementById('confidence-score') as HTMLSpanElement;

// Canvas context
const ctx = canvas.getContext('2d');

// State variables
let detector: poseDetection.PoseDetector;
let video: HTMLVideoElement;
let isAnalyzing = false;
let repCount = 0;
let lastPoseState = '';

// Initialize TensorFlow.js and load MoveNet model
async function initializeDetector() {
  await tf.ready();

  const model = poseDetection.SupportedModels.MoveNet;
  const detectorConfig = {
    modelType: poseDetection.movenet.modelType.SINGLEPOSE_THUNDER,
    enableSmoothing: true
  };

  detector = await poseDetection.createDetector(model, detectorConfig);
  console.log('MoveNet model loaded');
}

// Handle video upload
videoUpload.addEventListener('change', (e) => {
  const file = videoUpload.files?.[0];
  if (!file) return;

  const videoURL = URL.createObjectURL(file);
  videoElement.src = videoURL;

  // Reset counters
  repCount = 0;
  repCountElement.textContent = '0';
  confidenceElement.textContent = '0';
});

// Start analysis when button is clicked
analyzeButton.addEventListener('click', async () => {
  if (!videoElement.src) {
    alert('Please upload a video first');
    return;
  }

  if (!detector) {
    await initializeDetector();
  }

  isAnalyzing = !isAnalyzing;
  analyzeButton.textContent = isAnalyzing ? 'Stop Analysis' : 'Analyze Exercise';

  if (isAnalyzing) {
    // Make sure canvas matches video dimensions
    canvas.width = videoElement.videoWidth;
    canvas.height = videoElement.videoHeight;

    // Start playback and analysis
    videoElement.play();
    analyzePose();
  } else {
    videoElement.pause();
  }
});

// Main pose detection loop
async function analyzePose() {
  if (!isAnalyzing) return;

  if (videoElement.paused || videoElement.ended) {
    requestAnimationFrame(analyzePose);
    return;
  }

  // Detect poses
  const poses = await detector.estimatePoses(videoElement);

  // Clear canvas
  ctx.clearRect(0, 0, canvas.width, canvas.height);

  if (poses.length > 0) {
    const pose = poses[0];
    drawPose(pose);
    trackSquatRepetitions(pose);

    // Update confidence score
    const avgConfidence = calculateAverageConfidence(pose);
    confidenceElement.textContent = Math.round(avgConfidence * 100).toString();
  }

  requestAnimationFrame(analyzePose);
}

// Draw the detected pose on canvas
function drawPose(pose: poseDetection.Pose) {
  if (!ctx) return;

  // Draw keypoints
  for (const keypoint of pose.keypoints) {
    if (keypoint.score > 0.3) {
      ctx.beginPath();
      ctx.arc(keypoint.x, keypoint.y, 5, 0, 2 * Math.PI);
      ctx.fillStyle = 'red';
      ctx.fill();
    }
  }

  // Draw connections between keypoints
  drawConnections(pose);
}

// Draw lines connecting related keypoints
function drawConnections(pose: poseDetection.Pose) {
  const connections = [
    ['nose', 'left_eye'], ['nose', 'right_eye'],
    ['left_eye', 'left_ear'], ['right_eye', 'right_ear'],
    ['left_shoulder', 'right_shoulder'], ['left_shoulder', 'left_elbow'],
    ['right_shoulder', 'right_elbow'], ['left_elbow', 'left_wrist'],
    ['right_elbow', 'right_wrist'], ['left_shoulder', 'left_hip'],
    ['right_shoulder', 'right_hip'], ['left_hip', 'right_hip'],
    ['left_hip', 'left_knee'], ['right_hip', 'right_knee'],
    ['left_knee', 'left_ankle'], ['right_knee', 'right_ankle']
  ];

  // Create a map for quick keypoint lookup
  const keypointMap = {};
  pose.keypoints.forEach(keypoint => {
    keypointMap[keypoint.name] = keypoint;
  });

  // Draw the connections
  ctx.strokeStyle = 'blue';
  ctx.lineWidth = 2;

  for (const [first, second] of connections) {
    const firstKeypoint = keypointMap[first];
    const secondKeypoint = keypointMap[second];

    if (firstKeypoint && secondKeypoint &&
        firstKeypoint.score > 0.3 && secondKeypoint.score > 0.3) {
      ctx.beginPath();
      ctx.moveTo(firstKeypoint.x, firstKeypoint.y);
      ctx.lineTo(secondKeypoint.x, secondKeypoint.y);
      ctx.stroke();
    }
  }
}

// Track squat repetitions based on knee position
function trackSquatRepetitions(pose: poseDetection.Pose) {
  const leftHip = pose.keypoints.find(kp => kp.name === 'left_hip');
  const leftKnee = pose.keypoints.find(kp => kp.name === 'left_knee');
  const leftAnkle = pose.keypoints.find(kp => kp.name === 'left_ankle');

  if (!leftHip || !leftKnee || !leftAnkle ||
      leftHip.score < 0.5 || leftKnee.score < 0.5 || leftAnkle.score < 0.5) {
    return; // Not enough confidence in the keypoints
  }

  // Calculate knee angle
  const angle = calculateAngle(
    { x: leftHip.x, y: leftHip.y },
    { x: leftKnee.x, y: leftKnee.y },
    { x: leftAnkle.x, y: leftAnkle.y }
  );

  // Determine squat state based on knee angle
  const currentState = angle < 120 ? 'down' : 'up';

  // Count repetition when transitioning from down to up
  if (lastPoseState === 'down' && currentState === 'up') {
    repCount++;
    repCountElement.textContent = repCount.toString();
  }

  lastPoseState = currentState;
}

// Calculate angle between three points
function calculateAngle(p1: {x: number, y: number},
                       p2: {x: number, y: number},
                       p3: {x: number, y: number}): number {
  const radians = Math.atan2(p3.y - p2.y, p3.x - p2.x) -
                 Math.atan2(p1.y - p2.y, p1.x - p2.x);
  let angle = Math.abs(radians * 180.0 / Math.PI);

  if (angle > 180.0) {
    angle = 360.0 - angle;
  }

  return angle;
}

// Calculate average confidence across all keypoints
function calculateAverageConfidence(pose: poseDetection.Pose): number {
  const scores = pose.keypoints.map(keypoint => keypoint.score);
  const sum = scores.reduce((total, score) => total + score, 0);
  return sum / scores.length;
}

// Initialize the application
initializeDetector();
Understanding the Key Components
Let's break down the essential components of our pose detection application:
- **Model Initialization**: We load the MoveNet model, which is optimized for single-person pose detection and offers excellent performance in browser environments.
- **Video Processing**: The application handles video uploads and creates a canvas overlay for visualization.
- **Pose Detection Loop**: We run continuous detection on each frame of the video to track movements in real-time.
- **Keypoint Visualization**: The detected keypoints and connections between them are drawn on the canvas, creating a skeletal overlay.
- **Exercise Tracking**: By analyzing the angles between specific body parts (like knees, hips, and ankles), we can detect when a squat occurs and count repetitions.
Extending Beyond Squats: Supporting Other Exercises
While our initial implementation focuses on squat detection, the same principles can be applied to track other exercises. Each exercise would require defining specific angle thresholds and key points to monitor.
// Example function for tracking push-ups
function trackPushupRepetitions(pose: poseDetection.Pose) {
  const leftShoulder = pose.keypoints.find(kp => kp.name === 'left_shoulder');
  const leftElbow = pose.keypoints.find(kp => kp.name === 'left_elbow');
  const leftWrist = pose.keypoints.find(kp => kp.name === 'left_wrist');

  if (!leftShoulder || !leftElbow || !leftWrist ||
      leftShoulder.score < 0.5 || leftElbow.score < 0.5 || leftWrist.score < 0.5) {
    return;
  }

  // Calculate elbow angle
  const angle = calculateAngle(
    { x: leftShoulder.x, y: leftShoulder.y },
    { x: leftElbow.x, y: leftElbow.y },
    { x: leftWrist.x, y: leftWrist.y }
  );

  // Determine push-up state based on elbow angle
  const currentState = angle < 90 ? 'down' : 'up';

  // Count repetition when transitioning from down to up
  if (lastPoseState === 'down' && currentState === 'up') {
    repCount++;
    repCountElement.textContent = repCount.toString();
  }

  lastPoseState = currentState;
}Performance Considerations
When implementing face detection using TensorFlow.js or pose detection with TensorFlow.js, performance is a critical consideration. Here are some tips to optimize your application:
- Choose the appropriate model variant (MoveNet has Lightning and Thunder variants, with different speed/accuracy tradeoffs)
- Consider reducing the resolution of video processing for better performance
- Implement throttling to reduce the frequency of pose detection calls
- Use WebGL backend for TensorFlow.js to leverage GPU acceleration
- Consider implementing a worker thread for pose detection to prevent UI blocking
Conclusion
Building a pose detection application with TensorFlow.js and MoveNet demonstrates how accessible advanced computer vision has become for web developers. Even without extensive frontend experience, you can create sophisticated applications that analyze human movement in real-time, directly in the browser.
This project serves as an excellent introduction to the capabilities of TensorFlow.js for pose detection. The same principles can be applied to various applications beyond exercise tracking, including gesture control interfaces, dance analysis, physical therapy assistance, and interactive gaming experiences.
As you become more comfortable with the technology, you can explore more advanced features like multi-person tracking, 3D pose estimation, or combining pose detection with other ML models for more sophisticated analysis.
Let's Watch!
Build a Pose Detection App with TensorFlow.js and MoveNet: A Beginner's Guide
Ready to enhance your neural network?
Access our quantum knowledge cores and upgrade your programming abilities.
Initialize Training Sequence